Showing posts with label meatless. Show all posts

Wednesday, August 8, 2012

it makes me very happy.....

being home. as much as I love roadtripping, it feels so good to sleep in our own tiny house in our own tiny room. 
clean sheets.
fresh utah peaches....
....for breakfast, lunch, dinner, bredtime snack.
technology....all of our family lives so far away and I love that I can reach them so quickly via phone or text. after text after text.
kids who sleep in.
drinking ice cold water.
the tuesday night farmer's market has started!
going to the library.
babies. I have been so lucky to be able spend time with my new niece and new nephew in the past few weeks. babies are the best.

Something that makes me very VERY happy, is bringing a few things in from the garden, and mixing and matching our garden goods with my farmer's market finds to make a quick easy dinner that 
everyone loves, and doesn't heat up the kitchen.

We had this with a side of sliced garden tomatoes and mozzarella, and a pile of peaches....kind of a random assortment for dinner, but oh well.
www.inthelittleredhouse.blogspot.com
Warm Zucchini, Corn, and Black Bean Salad
in a large pan with olive oil on medium high heat saute:
-2 medium zucchini, diced
-2 ears of corn, cut off the cob
-1 small red onion, diced
-1 jalapeno, seeded and diced
-2 garlic cloves, minced
-large pinch of coarse salt

when zucchini starts to get tender (I cooked mine for 7-8 minutes, but you can cook it as long as you like, depending on how small you diced it, and how firm you like it), add: 
-2 cups of black beans, drained and rinsed
cook for a few more minutes until beans are heated through. 
turn off heat and add:
-zest of 1 lime
-juice of 1 lime
-a large handful of chopped cilantro
mix together and enjoy!

this recipe is one of our favorites--my kids LOVE it and it's so versatile. 
 -eat is as a side OR a main. 
-it's great cold the next day for lunch
-add it to toasted corn tortillas for tacos
-throw it in with some lettuce, tomatoes, and avocados for a taco salad. 
www.inthelittleredhouse.blogspot.com

What makes YOU very happy?

Tuesday, July 24, 2012

grilled guacamole

I LOVE guacamole. I could eat it every day (and often do). 
It pairs well with so many things, and it's perfectly easy to throw together. 
I also love putting veggies on the grill, and in the summer it's just about the only way I cook vegetables--brush with olive oil and grill. easy easy. 
So when I pulled out my guac ingredients when I was already prepping to grill some fish......I just thought......why not?!
the little red house blogthe little red house blogthe little red house blog
Grilled Guacamole
I wondered if this would even turn out all that different than raw guacamole, and I was so happy with the results. It made a completely different dish.  The onion flavor was much more tame, and the jalapeno had a deeper, roasted flavor. 
These measurements are approximate--add a little and subtract a little as you like. For me the perfect guacamole is all about the salt and lime--as long as you have those to things you are set.

-2 ripe avocados
-1 jalepeno
-a small handful of onion (as you can see I used two tiny onions from the garden--I don't like the onion to overpower. play around with more if you like.)
-handful of cilantro, finely chopped
-juice of 1-1 1/2 limes (add a little at a time until you reach your perfect "limeyness")
-large pinch of kosher salt (also taste as you go with the salt. I add or take away a little depending on how salty my chips are as well. I'm telling you, salt is KEY)

-Cut avocados in half, take the seed out, and brush the insides with olive oil. 
-brush onion and pepper with olive oil. 
-Grill on medium heat until grill marks appear, and pepper starts to blacken (be sure to rotate the jalapeno)
-Scoop the insides of the avocado out, finely chop the onion, rub the skin off of the jalapeno (it should come off easily) and take the seeds out if you don't want it too spicy. dice.
Add grilled veggies to bowl with lime, cilantro, and salt. 
Mash with a fork to combine.
Let chill in the refrigerator for about an hour so flavors can mingle and party it up.
Servie it up with chips, fish tacos, burrito bowls, breakfast burritos, or our favorite nachos. the little red house blogthe little red house blog

enjoy!

What's in YOUR guacamole? 

Wednesday, July 18, 2012

a summer salad

 aaaahhhhh summer salad. so easy, so good. 
the little red house blog 
I love taking a handful of this, and a handful of that from the garden and throwing it together and calling it a salad. This was the first broccoli I've had from the garden--it has taken forrrrrrevvverrrr to grow, but it has been fun to watch a GIANT broccoli plant (it could gobble my children) grow out of the ground from a tiny little seed. the little red house blog
A Summer Salad
-greens
-zucchini 
-broccoli
-warm-from-the-sun-tomatoes
-mozzarella
-onion
-basil
-olive oil and balsamic vinegar (I didn't even bother to make a dressing--I just splashed a bit on)
-a pinch of salt and fresh ground pepper

Step One: throw all ingredients together
Step Two: Eat.

If you had a few extra minutes this would be awesome with grilled zucchini and broccoli, 
but I also like it raw and fresh.
the little red house blog
enjoy!
What's in your salad right now?

Wednesday, July 11, 2012

how to eat zucchini

Zucchini.
the little red house blog 
Do you grow it? Then you probably have 700 zucchini right now.......right?
 They kind of explode starting in July. The good news is, there are so many things you can put zucchini into, and so many ways to eat it (personally, I never get tired of it simply grilled.....yum)

**gardeners tip*** I kind of laugh that I am giving any kind of gardening tip, because I am still pretty clueless, but the last few years my zucchini have only done ok......we didn't have all the extras everyone always complains about. The plant would be LOADED with tiny zucchini, and then they would shrivel and turn yellow. From what I understand (please correct me if I am wrong--I know some of you are expert gardeners) this is because they aren't getting pollinated. This year I put a few little pots of petunias right next to my zucchini plants, and I also let my leftover radishes go to seed (they flower at the top). I have so many bees in my garden now (they are LOVING the radish blossoms!) and my zucchini have been doing better than any other year.....just a thought.

Zucchini is no super food, but it is still rich in fiber and has 40% your daily value of vitamin A in one serving. It also has smaller amounts of vitamin C, potassium, and manganese and a handful of B vitamins......and it's easy to grow, so eat up!

Grilled Zucchini and Squash
My favorite way (and it's very simple) to eat it, is sliced thin, tossed in olive oil,  fresh lemon juice, and salt and pepper. This time we mixed in some summer squash with it. Grill it for a few minutes on each side, give it a squeeze of lemon and VWALLA! The perfect summer side dish.
the little red house blog

Have you ever checked your garden one night and all is well, and the next morning you head out and giant alien zucchini have taken over? They grow so quickly! When I have a few large zucchini around I love to stuff them.  The best part is really you can put ANYTHING in them. A lot of stuffed zucchini recipes are baked, but remember--my oven is currently off duty. 
So I wanted to put these on the grill.

Grilled Stuffed Zucchini

-Cut zucchini in half long ways down the middle. 
I then cut his in half, just so it was easier to work with and eat, but you can keep it whole if you want.

-Scoop out the seeds, so you have your little zucchini boat.
-Brush with olive oil.
-Place on an oiled grill flesh side down (medium-ish heat), close the lid, and let it cook for about 8-10 minutes. Check in on them so they don't overcook--all grills cook differently. You want them to be fork tender, but not quite all the way done.
-Make your filling. I used: (measurements approximate-it will all depend on how big your zucchini is)
-1 cup butter beans
-2 small tomatoes
-small handful chopped kalamata olives
-small handful of chopped green onions
-small handful of goat cheese
-about 1/4c basil pesto
-pinch of salt
mix together.

-Fill your zucchini and top with another sprinkle of goat cheese 
(you can never have too much goat cheese)

Place them back on the grill, this time skin-side down, close the lid and let them cook for about 5 more minutes, until zucchini is all the way tender, and filling is heated through.

Top with a sprinkle of chopped arugula.
the little red house blogthe little red house blogthe little red house blogthe little red house blogthe little red house blog 
 Like I said before, you can add anything in to the filling. The beans made them perfect for lunch, but if you want them as a side dish, omit the beans and add some more veggies--maybe peppers and artichoke hearts. Skip the pesto and mix in some lemon juice and olive oil. 
Swap the goat cheese for feta. Endless possibilities!
the little red house blogthe little red house blog 
enjoy!

Here are a few more ways that I have used zucchini in the past:
Black bean, corn, and zucchini salad (great with the fish tacos)
It can be thrown into pasta like this one with arugula pesto.
Add it to soups like a simple minestrone.

from around the web:
Zucchini Cobbler over at Happy Yolks
Zucchini Toasts from Sprouted Kitchen
Bacon Zucchini Quiche from Always with Butter
Spicy Zucchini Frittata  from Whole Living
Also check out reader suggestions on my facebook page (here!)

How do YOU eat zucchini?

Monday, April 2, 2012

beet it

Beets. 
Did you know they are rich in dietary fiber, folate, iron, magnesium, manganese, potassium, and vitamins A, B1, B2, B6, and C? It's true. 

A few summers ago I was wandering the farmers market and saw a pile of purple and gold beets overflowing a little farmer's table. 
They were beeeeaaauuuutiful. 
I had to have them. 
I had never had beets before (unless you count the canned variety, which I always passed up thank you), and didn't really know what to do with them. 

So I prepared them like I would any vegetable I'm not sure what to do with...... I roasted them. 
Slice them up, toss in olive oil, salt and pepper, maybe a few herbs and roast them at around 400 or so until they are fork tender. 
They can be eaten straight off the pan, or tossed in to a salad.
And did you know you can eat the beet greens!? Yes.
Just saute' them in a little olive oil, or use them like you would any of your other greens.
Beet greens actually have more iron and calcium than spinach.....so eat up!

I wanted to branch out and try something different than roasted beets, and I had recently heard mention of beet chips.....
so here is my take. 

Lemon and Cracked Pepper Beet Chips
beets
zest of 1/2 lemon
lemon olive oil (or regular if you don't have lemon)
coarse salt and cracked pepper

-remove beet tops (eat your greens!)
-peel beets (your hands will turn pink!)
-slice as thin as possible (maybe you have a mandolin slicer,
I used the slicey side of the cheese grater (actual term))
-toss in lemon olive oil and lemon zest (your hands will get pinker!)
-spread out on a parchment lined baking sheet (for 3 beets I used two baking sheets)
-sprinkle with salt and pepper
-bake at 350° for about 30 minutes. 
-make sure to CHECK your chips--the smaller ones may have to be taken out sooner--
don't let them burn. 
-remove when chips are crisp. 
Don't leave the room--they disapear too fast.
We ate 3 beets in about 3 minutes. 
yum.
beet1 copybeet2 copybeet3 copybeet4 copybeet5 copybeet6 copy
enjoy!
Beet juice can be used as a dye as well. 
Use it to color your Easter eggs this weekend. 
I've seen pasta cooked in beet water for pink pasta. 
Cute Vanessa used it for a homemade cheek stain


for more beet action use your easter eggs to make robby's pickled eggs or
this salad with goat cheese and avocado looks amazing.


How do YOU like beets?

Tuesday, March 13, 2012

how to eat......cabbage

Cabbage?
Cabbage!
To be honest, up until about a year ago when I thought about cabbage, I thought of it mostly as a garnish. I had never bought cabbage and cooked with it, and wasn't really sure how to.....
....and then I started exploring, and I am now a true cabbage believer.

Cabbage is good source of vitamin K, C, A, and fiber.
It's rich in antioxidants, helps boosts immunity, and contains sulphur which helps act as a cleansing agent for the digestive system. (source)
I loved finding this page listing all the healing benefits of cabbage.
All cabbage has health benefits, but I always buy red cabbage (sometimes called purple), because I just love the color it adds to any dish, and because of the deep purple color it's a little bit richer in antioxidants than the green varieties.
cabbage1 copy
I LOVE the crunch it adds to everything. 
-chopped up and mixed in to salads
-in fish tacos!
-tossed with vinegar and s&p is a perfect topper to burrito bowls

To prepare cabbage, remove outer leaves, cut off stem end, and wash thoroughly, making sure to wash out any dirt that may be in between leaves.

Roasted Cabbage with Gorgonzola
preheat oven to 425°
slice cabbage into 1/2 inch slices and brush both sides with olive oil. 
roast for 25-30 minutes until edges start to brown. 
top with a few sprinkles of gorgonzola and roast for about 5 more minutes until cheese starts to bubble.
Top with cracked pepper and enjoy!

cabbage2 copy

Here is a quick and easy meal with ingredients I always have on hand. 
Huevos Rancheros
-corn tortillas (I usually toast these over the flame of my gas stove to blacken the edges)
-black beans, cooked in a bit of lime juice and cumin
-chopped cabbage mixed with avocado, green onions, lime, cilantro, s&p
-eggs, fried up in a bit of olive oil
sprinkle of red pepper flakes
cabbage4 copycabbage3 copy
enjoy!

for more adventures in cabbage:
I topped these lentil fritters with cabbage
I spotted this kale slaw with red cabbage and carrots from whole living
I have this late winter salad from happy yolks bookmarked to try

How do YOU like cabbage?

Wednesday, February 22, 2012

meat and meatless

Mmmeeeeaaaaattt.
I have to say it like that, and then I always picture meat-loving Ron Swanson for some reason.

Just one tiny word can become such a hot topic!
Lovers, haters, and all the inbetweeners.
I have posted my thoughts on meat before, but like to revisit the topic every now and then.

Before I headed off to college, I had no problem with meat, and ate it any time it was placed in front of me. (and remember how I loved fast food.....yeah.)
Besides my love for a wendy's burger, I didn't eat a lot of meat my first year at school, simply because I couldn't afford it, and even if I could, I had no idea how to cook it.
Being married just a year later, not much had changed.....oh wait, we were even more poor, which meant even less meat.
A few years passed and we both had real jobs that allowed for us to purchase something meaty every now and then, and I was slowly learning to cook, I'd try my hand at beef. chicken. pork.
and I didn't like it.
Any if it.
Going a few years without it, it just didn't taste good to me anymore.
And if you have been reading a while, you'll remember my fat phobia....I figured my diet was just better without meat.
I stuck with mostly chicken dishes, and swore off burgers for years, always opting for a turkey or veggie option (what a shame!).

Over the last few years, I've started to educate myself more and more about meat, and re-introduce it into our diets. I truly believe that there were animals placed on this earth for us to enjoy.
but enjoy sparingly. 

I also believe that these animals should be raised as animals. 
in grassy green fields with butterflies and disney birds and a catchy tune playing in the background.
happy.

Well my friends, buying happy animals to cook for my family isn't the cheapest option, so we limit our meat consumption so we can eat
well raised
well fed
no hormone
no antibiotic
happy
animals.

We have an small extra freezer so when I see good deals (even the farmers market will put certain cuts off beef on sale!) I can get extra to keep on hand.
We only eat meat 1-2 times a week.
I love finding new meatless dishes that are tasty and filling.
Here is one of them:
lentil fritters copy
Lentil and Bean Fritter Pitas
recipe adapted from Real Simple

Ingredients
2 cups soaked lentils
2 cups soaked garbanzo beans
1/2 cup fresh cilantro leaves
1 cup fresh flat-leaf parsley leaves
1 clove garlic, finely chopped
1/2 teaspoon ground cumin
pinch of cayenne (optional)
1/2 cup bread crumbs (or 2 slices of wheat bread, toasted and pulsed in the food processor)
1/4 head red cabbage, shredded (about 1 1/2 cups)
juice of 1 lemon
 olive oil
s&p
1/2 cup Greek yogurt
1/4 teaspoon crushed red pepper, plus more for serving
avocado slices (I took this photo, and then right before we ate I realized I had an ripe avocado. I fit perfectly with these.)
4 pocketless pitas, warmed (or homemade whole wheat naan)

Directions
In a food processor, puree 1 cup of the lentils with the garbanzo beans,cilantro, 1/2 cup of parsley, garlic, cumin and cayenne until nearly smooth. Transfer to a bowl and mix in the bread crumbs, the remaining  lentils, salt and pepper.  Form into sixteen ½-inch-thick patties.
In a large bowl, using a wooden spoon, lightly mash the cabbage with a squeeze of  lemon juice, a drizzle of olive oil, salt and pepper; set aside.
 In a small bowl, stir together the yogurt, a few squeezes of lemon juice 1/2 cup finely chopped parsley, and crushed red pepper. 
Heat 1 tablespoon of the olive oil in a large nonstick skillet over medium-high heat. Working in 2 batches, cook the patties until browned, 3 to 4 minutes per side, adding more oil to the skillet for the second batch.
Dividing evenly, top each pita with the patties, cabbage mixture, avocado (if using) yogurt sauce, and a sprinkle of red pepper flakes. 

I can't wait for summer when tomatoes and pepper are plentiful--I think they would be a great addition to this dish.

I think it's important to educate ourselves about all of the food we eat, whether we love meat or don't eat any animal products at all--it's always good to know where our food is coming from, so we can make the best choices for ourselves and our families.
If you would like to learn more about why it's important to eat "happy" meat, I always recommend the movie Food Inc. I think it's a good place to start.

What are your favorite meatless dinners?

Monday, January 23, 2012

a winter favorite

Brussels Sprouts. 
a favorite? 
really?
yes!
Teeny green adorable members of the cabbage family. They tend to be one of the more snubbed veggies out there in veggieland, but only because you've been eating them wrong.....these are a big time favorite around here--even with my kids! We eat them often in the winter months--they are very versatile and and contain a healthy dose of fiber, and more than your days worth of vitamin C and K in one serving (about 6 sprouts).

While I was doing a little research, I learned that boiling them was a popular way of preparing them. May I offer up a suggestion? please?
STOP BOILNG YOUR BRUSSELS. 
I would like to take out a public service announcement that says this. 

Boiling does nothing for their flavor, it decreases nutritional benefits, and it turns them into a bowl of mush......no wonder people don't like them. If you leave this post with anything, please remember,
 no boiling.

So how should you be preparing them? Let's talk about it.

First. You need to admire them.....they really are different. Layer upon layer of green--and have you seen them grow? They grow on a tall stalk.....appearing to be a bit alien-ish....I love it.
 Has anyone grown these? How did it go? 
It's something I would like to try out in the first cool months of spring.
brussels1 copy
Ok so you've admired them. 
Now wash them. 

Cut off what's left of the stem--this is bitter and you don't want to eat it. It also allows you to easily peel off any of the outer leaves that may be discolored.
brussels2 copy
A tasty way to eat them, is roasted!
You can roast them whole, or cut them in half. 
I like to half them so they are a bit easier to eat, and they roast faster. 

Roasted Brussels Sprouts:
 Toss halved sprouts with olive oil, salt and pepper, and roast at 400° for about 30 minutes until outsides are crispy......the outside crispy leaves are the BEST. 
I usually add another sprinkle of salt when they come out of the oven and they are delicious! 

But from here you can add anything. 
A squeeze of lemon. 
A splash of balsamic vinegar. 
A sprinkle of parmesan cheese. 
Anything goes. 

Or add them to something......
brussels5 copy

Wild Rice Pilaf with Brussels Sprouts and Pecans
ok ok maybe the bold title made you think this was a "recipe" but it's just an idea of flavors together--use whatever amounts you like. 
you'll need:
-wild rice mix (cooked in chicken or veggie stock)
-saute' some leeks in a few TBS of butter, after they are soft add a handful of chopped pecans. cook until pecans are fragrant. 
-roasted brussels sprouts (see above)

mix rice, leek and pecan mixture, and brussels for a tasty and filling side dish.

*** 

The quickest way I have found to cook them is right on the stove top--and again the possibilities of what gets mixed in is endless. 

After you have washed them and removed the stems (above), slice them thinly. 
They will fall apart and begin to shred on their own. 
brussels3 copy
Now we are going to make my favorite.....
brussels6 copy
Brussels Sprouts with Bacon, Avocado, and Lime
1lb brussels sprouts
2 slices bacon (If you are a bacon LOVER, you may want to add a slice or two more....I think this is just enough.)
1 garlic clove, minced
juice of 1 lime
1 avocado, sliced
a pinch of crushed red pepper (optional)
olive oil
salt and pepper

While you are slicing your brussels, cook the bacon until crispy in a large skillet.
Remove from pan.
Add a little olive oil to the pan (depending on how much bacon drippings were left over), and add your shredded brussels, garlic, and crushed red pepper.
Cook for just a few minutes on medium heat, until brussels start to get tender.
Mix in lime juice and crumble bacon into the sprouts. s&p to taste.
Scoot your sprouts over to the side of the pan, and add avocado slices--just to quickly warm each side. You don't really want to stir them around into the sprouts or they will mash right in. 
When they are heated through, mix everything together and enjoy!

How do YOU eat brussels sprouts?


and there is more!
I added brussels sprouts to my salad here
Giada's mix of roasted winter veggies (here) looks delicious and easy
I am itching to try this brussels and pear combo (here)

I've had quite few requests for beets.....I'm on it! 

Sunday, January 15, 2012

eat your greens

Last month I decided to start spotlighting different fruits and veggies--why we like them, and how we eat them. (I kicked things off with pomegranate)

This week I want to talk about greens.
We love greens. 
Now had you asked me a few years ago....I would have gagged. 
I didn't understand how to eat them.....or why you would want to. 
When I thought of "eating your greens", I imagined soggy spinach in some kind of cream sauce.
no thank you. 

This post will focus on kale, but most of the "recipe" ideas can be also used for collard greens or chard.

So what's so great about this stuff?

One cup of kale contains 36 calories, 5 grams of fiber, and 15% of the daily requirement of calcium and vitamin B6, 40% of magnesium, 180% of vitamin A, 200% of vitamin C, and 1,020% of vitamin K. It is also a good source of minerals copper, potassium, iron, manganese, and phosphorus.
[source]
It is a SUPER vegetable....so really, how could you pass it up?
And it sure is pretty....
kale1 copykale2 copykale3 copy
How to prepare it:
Very easy.
Wash.
The larger the leaf, the tougher the stem, so I usually just take the green right off the stem.
Chop into bite size pieces--perfect for almost any recipe you'll use it in. 
kale4
How to eat it: 
-Make a salad! Toss it with your favorite salad ingredients and a good vinaigrette.
-If it's your first experience with kale, it is a bit more chewy and hardy than a usual salad of romaine or baby lettuces, so mix a little bit of kale into your regular salad.
-Put it in your smoothie. You won't even know it's there.
-Make kale chips. Theses disappear so fast!
-saute' it in a little olive oil and garlic until it softens, give it a squeeze of lemon.
-put sautéed kale in your favorite pasta dish or on your pizza!
-buy Whitney Ingram's cookbook (coming soon!)--it has a delicious recipe for braised kale.
(cookbook update! many of you know I am photographing Whitney's cookbook. We have 4 shoots left, and we should have information for pre-orders soon....eeeeek! so exciting!)

Throw kale right into your soup!
this may be the easiest way to warm up to kale or any other green (and the best way to hide it from your kids!) Start out small--chop it up tiny and only add a cup the first time. If you like it, add more next time. (remember it may look like a lot at first....but it shrinks down to nothing.
chickenandkalesoup copy
Chicken Soup with Kale and Barley
if you are new to the blog (welcome!), just a disclaimer: most of my "recipes" are very loosely written, and are basically just me throwing stuff in a pot. feel free to interpret them as you like.

1 leek, finely chopped
4 carrots, sliced
5 garlic cloves, minced
1-2 cups chopped kale (or collard greens or chard), chopped into bite size pieces
2TBS chopped fresh thyme
1 TBS chopped fresh rosemary
1-2 chicken breast, cut into bite sized pieces
1/2 cup barley (you could use any grain you have--maybe wild rice or bulgur)
6 cups chicken stock
juice of 1 lemon
s&p

saute' in olive oil: leek, carrots, kale, and chicken pieces until onions are tender and chicken begins to brown on the edges
add garlic and herbs, s&p. cook for a few minutes.
add stock, lemon juice, and barley
bring to a boil, cover and reduce heat.
Let simmer on low for a few hours, until the barely is tender.

top with parmesan cheese and enjoy!

other soups with greens:
butterfly soup
chicken and white bean soup

How do YOU eat your greens?

Tuesday, June 28, 2011

everything in its season

I cannot tell you how happy I am to find myself leaving the farmer's market Saturday mornings with a bag full freshly picked deliciousness, just waiting to be gobbled up by my little family. As we move deeper into summer and each week passes, there are more and more options for dinner growing in our own backyard, and coming from the local farms around us.

When foods are picked the moment they are ripe--rather than days or weeks ahead of time like some produce you buy in the store--the difference is HUGE. 
The local produce actually TASTES, and it tastes wonderful. Incomparable. Basically, you haven't LIVED until you've eaten a freshly picked peach......really.

With all this perfectly fresh picked taste, you can focus a meal around the vegetables, instead of having them as a small, boring side dish smothered with some kind of sauce. 

When eaten in their season--when they are actually supposed to grow (strawberries in the spring/early summer, tomatoes in the summer, broccoli in the cooler months of spring/fall....etc), because they are picked and eaten right at their peak, they actually have more vitamins and nutrients than their phony cousins who are forced to grow year round, picked early, and shipped across the country. 

The bottom line is, the closer it grows to home, the better it is for you and the taste doesn't even compare.

My challenge for you this week is 
a) you still have time to plant a small garden/a few veggies in pots....
or b) find a farmer's market near you! (check here for an easy search). 
It's also a good way to try out new things that you may never grow yourself, or might not even find in the store. My kids love going to the famers market, and it's a good way to teach your kids about where our food comes from and let them talk to the farmers!


I planted arugula this year and it took off like crazy! What does one do with so much arugula? I decided to make a simple pesto with it, and tossed it with pasta and our farmer's market finds. 
I feel like every so often I need to make a disclaimer and remind people how I cook.......handfuls of this and pinches of that......no measurements so you can make it up as you go:)


Pasta with Arugula Pesto and Spring Veggies
for the pesto:
two large handfuls of arugula
1 handful of basil 
1/2 cup-ish toasted walnuts
1 garlic clove
juice of 1 lemon
handful of shredded parmesan cheese
olive oil until you reach the consistency you like 
salt and pepper to taste

add ingredients to a food processor or small chopper and let-er-rip.
Continue to slowly add in olive oil until the pesto is at a consistency you like (around a 1/2 a cup or so is what I used)
.
Cook your pasta according to package directions (we used whole wheat spaghetti)

While pasta is cooking, sauté fresh spring onions (NOTHING like store bought!), and zucchini in a bit of olive oil. When onions and zucchini are tender, mix in shelled peas and cook for a few minutes more. When pasta is done, strain and add to veggies, and then toss with pesto for a few minutes in the pan.

.

We finished off the rest of the pesto with mozzarella and our farmer's market tomatoes.
.

enjoy! 

I'd love to hear what you are finding at YOUR famers market or in your garden right now??!

Tuesday, March 15, 2011

burrito bowls

This is one of my favorite go to meals--we have it at least once a week for lunch, and it's a perfect quick dinner--especially if you already have the rice cooked. 
...\\
Burrito Bowls
-cooked brown rice
-black beans
-pepper jack cheese
-avocado
-salsa
-sour cream
-tortilla chips

....is that not the easiest thing you've ever made??
And the good thing is, you can mix it up. As spring and summer veggies come into season, you throw them in too. 
-zucchini
-tomatoes
-corn
-potatoes....really, anything goes.
burrito bowls....

enjoy!! 

I'd love to hear if you have a favorite, quick go-to meal...

Friday, January 14, 2011

black bean and rice soup

Most mornings I wake up with some idea....an inkling at least of what we'll have for dinner. 
This day I had no idea.
I opened the fridge, the cupboard......nothing. 
I opened the freezer......spanish rice from a few weeks ago. 
What would I do with that?
The same thing I do with every other left over ingredient.....throw it in soup.
And so this soup was born....and it's kind of one of those things that really does work with whatever you may  have lying around. Left over chicken? Throw it in. Corn tortillas....yum!
Let this soup be your canvas.
black bean and rice soup

Black Bean and Rice Soup

-1 small onion, diced
-3 garlic cloves, minced
-1 roasted red pepper, diced (since peppers aren't in season, I used a small handful of jarred roasted red peppers)
-1 can of diced tomatoes 
-4-5 cups chicken stock (or vegetable stock)
-2 cans of black beans, drained and rinsed
-2 cups cooked spanish rice (plain rice would be fine if you don't have leftover spanish rice, you might want to up your seasonings a bit. I love the organic wild rice blend that Costco sells)
-1/2 tsp chipotle flakes (1/4tsp if you don't like it spicy)
-1TBS chili powder
-1 tsp cumin
-1/4 tsp dried oregano
-salt to taste

Saute' onion in a bit of olive oil until translucent--about 5 minutes. 
Add garlic and chipotle flakes, and cook for about 2-3 minutes.
Add the rest of the ingredients.
Simmer for a few hours--the soup is officially "done" as soon as it's hot, but I like to let soup simmer for the afternoon so all the flavors can play together for a while. 

Top with cilantro, your favorite tortilla chips, and a squeeze of lime.

enjoy!  


Thursday, August 12, 2010

fire grilled

-your favorite homemade crust
-peppers
-tomatoes
-artichokes
all thrown on the grill

-salty olives
-fresh mozzarella
-goat cheese

all grilled to melty perfection.

firegrilledpizza

Thursday, June 17, 2010

yes, we eat a lot of pizza.

I love it. I can't get enough these days.
When I'm not eating it, I'm probably thinking about it.....strange? no.

I'm still using the same old crust recipe--I can quickly throw it together from memory (although this time I added a teensy bit of wheat flour). I still used the grill, but also used a pizza pan this time (one with little holes in it), which made for a much easier grilling process. I have been loving playing with pizza, and think it should be a new little segment around here.
Segment. Like we're on a talk show, you know?
I will post new things as I try them (still really wanting to explore crusts more, this one is crispy, but still missing that wow factor.)
This is my favorite topping combo to date!

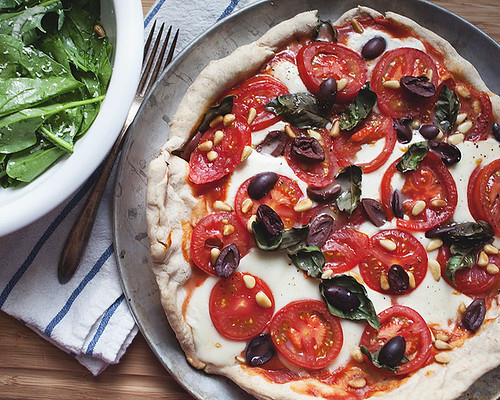
Margherita Pizza with Olives and Toasted Pine Nuts

Crust (recipe from Living)

*this will make 4 pizzas--I freeze the dough so I can pull it out in a hurry*

2 1/4 teaspoons active dry yeast (one 1/4-ounce envelope)
2 cups warm water (105 degrees to 115 degrees)
4 to 4 1/2 cups unbleached all-purpose flour, plus more for dusting
1 cup whole wheat flour
2 teaspoons fine sea salt
Extra-virgin olive oil, for bowl

Directions

Dissolve yeast in warm water in a large bowl and let stand for 5 minutes. Stir in 3 cups flour and the salt, stirring until smooth. Stir in an additional 2 cups flour; continue adding flour (up to 1/2 cup), 1 tablespoon at a time, stirring until dough comes away from bowl but is still sticky.
Turn dough out onto a lightly floured work surface, and knead with lightly floured hands. Start by slapping the dough onto the counter, pulling it toward you with one hand and pushing it away from you with the other. Fold the dough back over itself (use a bench scraper or a wide knife to help scrape dough from surface). Repeat until it's easier to handle, about 10 times. Finish kneading normally until dough is smooth, elastic, and soft, but a little tacky, about 10 minutes.
Shape dough into a ball and transfer to a lightly oiled bowl; turn to coat. Cover with plastic, and let rise in a warm place until it doubles in volume. Press it with your finger to see if it's done; an indent should remain.

Meanwhile, scrape dough out of the bowl onto floured surface, and cut it into 4 pieces. Shape into balls. Dust with flour, and cover with plastic. Let rest, 20 to 30 minutes, allowing dough to relax and almost double.
Holding top edge of 1 dough ball in both hands, let bottom edge touch work surface (refrigerate remaining balls as you work). Carefully move hands around edge to form a circle, as if turning a wheel. Hold dough on back of your hand, letting its weight stretch it into a 12-inch round. Transfer dough to a lightly floured pizza peel (or an inverted baking sheet). Press out edges using your fingers. Jerk peel; if dough sticks, lift, and dust more flour underneath.

Place dough onto oiled pizza pan. Place on grill preheated to medium high heat. Grill until crust is almost done.
Put your favorite toppings on. Place back on grill (lid down) until cheese is melted, edges are golden, and we like the bottom a bit blackened.

Toppings
-a super duper thin layer of good quality crushed tomatoes, or a good tomato sauce
-tomato slices
-fresh mozzarella slices
-toasted pine nuts
-kalmata olives
-fresh basil
-cracked pepper

mmmm.......pizza.